

Polymeric sand doesn’t have one dependable lifespan in pavers. How long it holds depends on joint condition, installation quality, and exposure to weather and use. Careful installation helps keep the material in place, but joints may still need attention as a patio or walkway ages.
If you’re considering paver restoration in Bucks County, understand what polymeric sand does before deciding whether it suits your surface. This guide explains how it works, what affects its durability, and what professional installation involves. It also covers residue on textured pavers and when another jointing material may be a better fit.
Key Takeaways
- Learn how polymeric sand differs from regular jointing sand and why the right material depends on the paver joints and surface.
- Understand what influences how long the joints hold up, including installation quality, weather exposure, and everyday use.
- See why textured pavers can develop a stubborn haze and what careful surface preparation can do to reduce residue risk.
- Explore alternatives and the conditions that can make them a better match for a particular patio or walkway.
- Find out what professional installation involves, including how long pedestrian and vehicle traffic should stay off the finished surface.
What Is Polymeric Sand?
Polymeric sand is jointing material made from sand and binding additives that activate with water. Once set, it holds together more firmly than ordinary loose sand. Regular jointing sand remains granular, so movement, water, and routine cleaning can displace it more easily. Choose between them based on paver material, joint dimensions, and how the surface is used.
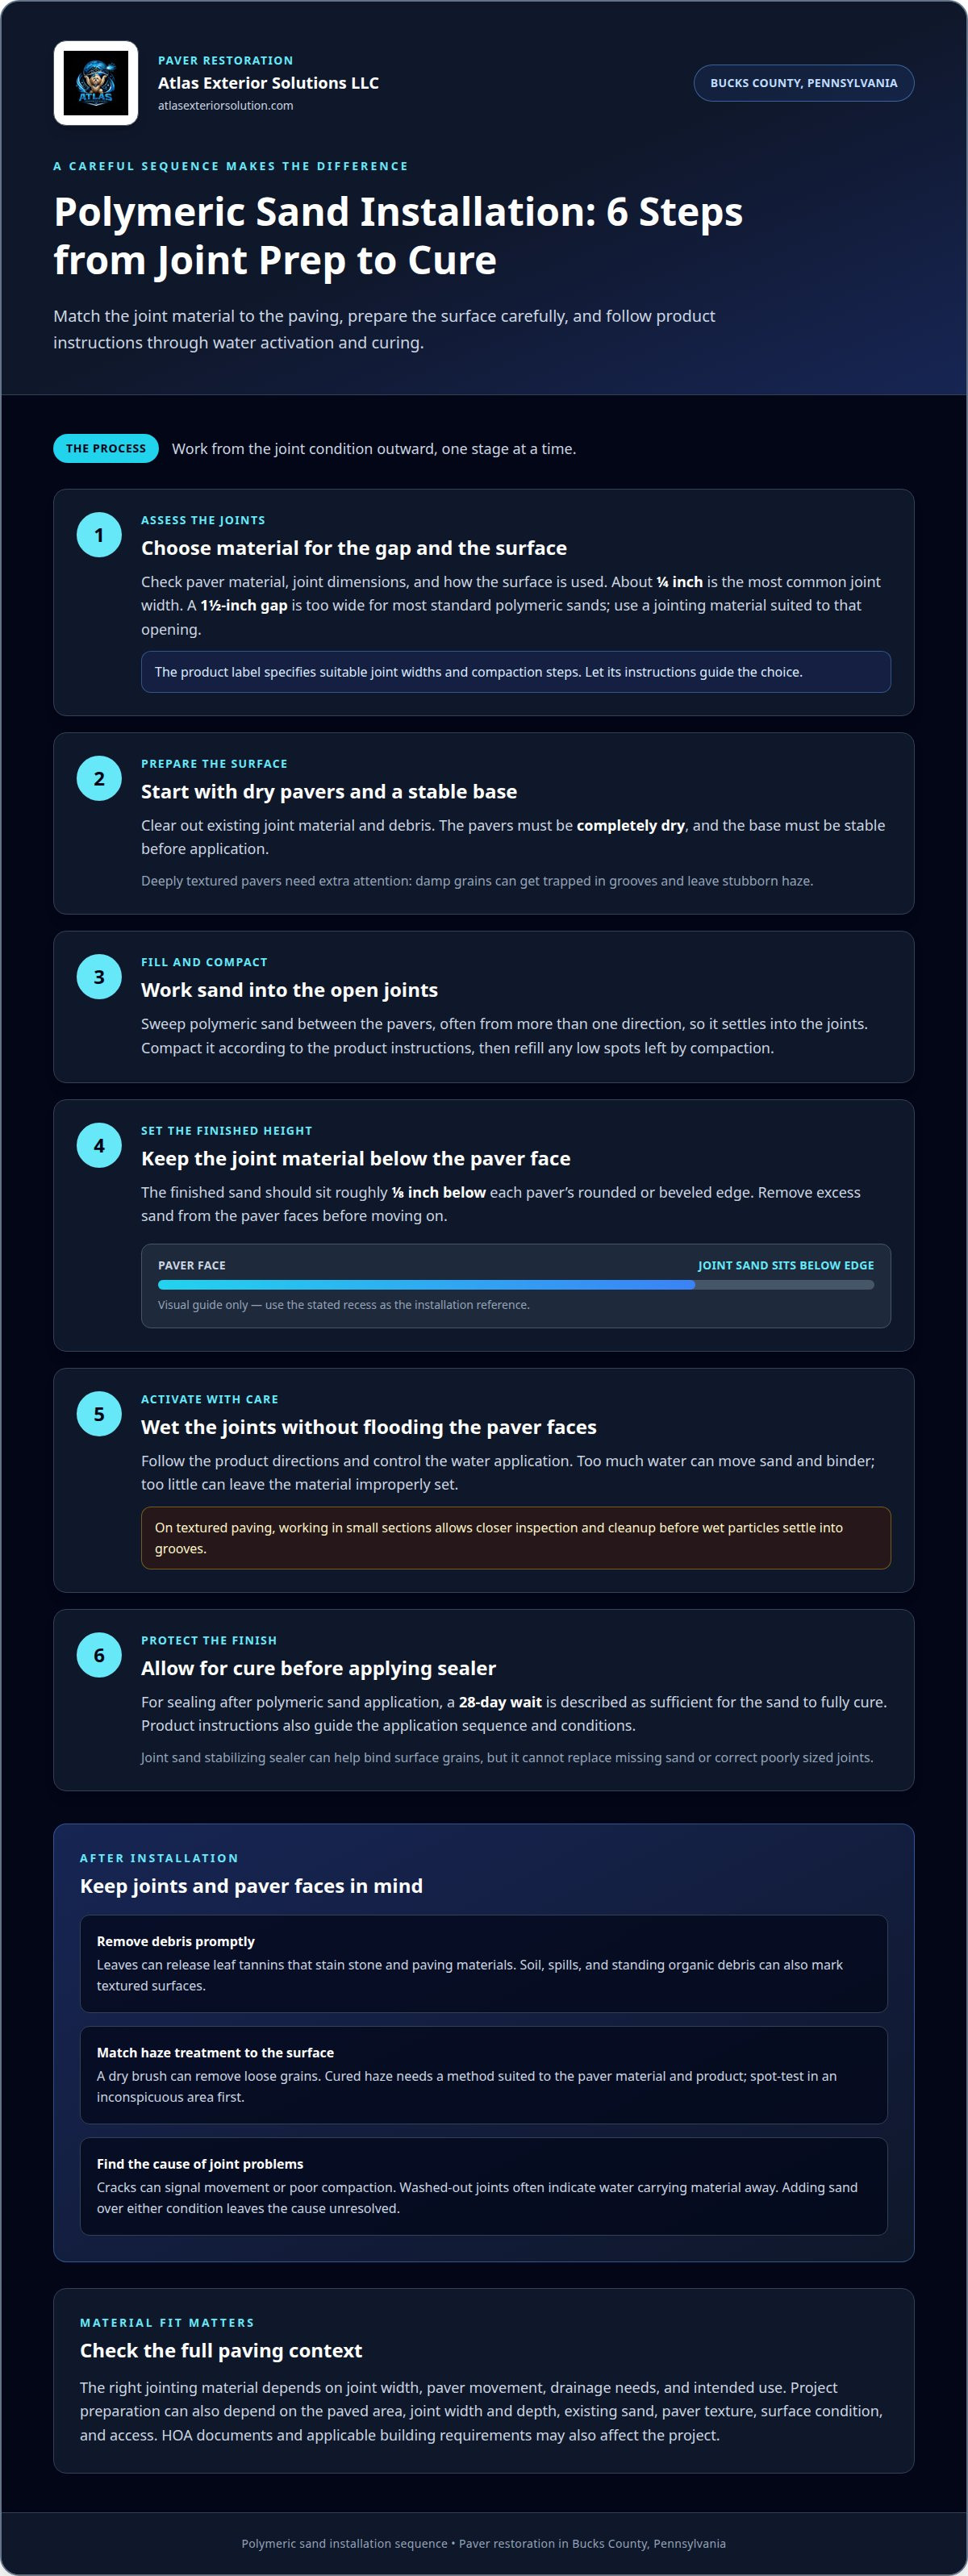
Selecting polymeric sand for pavers starts with measuring the joints and matching the product to the paving. About 1/4 inch is the most common joint width. Manufacturers’ bag instructions specify suitable joint widths and compaction steps, so the product label guides the choice. A 1 1/2-inch gap is too wide for most standard polymeric sands. That wider opening needs a jointing material suited to its dimensions.
Professionals sweep polymeric sand between pavers so it settles into the open joints, often working from more than one direction. They compact it according to the product instructions, then fill low spots left by compaction. The finished sand should sit roughly 1/8 inch below each paver’s rounded or beveled edge. This recess keeps joint material below the exposed paver surface.
Preparation affects how well polymeric sand for pavers performs. The pavers must be completely dry, and the base must be stable before application. Professionals clear out existing joint material and debris, then sweep in new sand and remove excess from the paver faces. On deeply textured pavers, damp particles can become trapped and leave stubborn haze, so careful surface cleanup is essential.
Joint sand stabilizing sealer is another treatment professionals may apply over filled joints. It helps bind surface grains, but cannot replace missing sand or correct poorly sized joints. For sealing after polymeric sand application, a 28-day wait is described as sufficient for the sand to fully cure. Product instructions also guide the application sequence and conditions.
Local requirements may affect a project. HOA documents can set material or appearance conditions, while applicable building requirements depend on the project and location. A professional considers these alongside the paving layout. The scope also depends on paved area, joint width and depth, existing sand, paver texture, surface condition, and access. These details help determine the material and preparation needed.
When considering joint materials, expansion-joint material is typically 3/8″ thick. This is a separate sizing consideration from choosing polymeric sand for paver joints; gap dimensions remain important when matching material to the paving.
If the surface has sealer, applying new polymeric sand over it may prevent the sand from bonding as desired. That possibility makes the order of treatments worth considering alongside product instructions, rather than assuming a fresh layer will adhere correctly over a sealed area.
Preventing residue on textured pavers
Deep grooves make textured pavers more prone to polymeric sand residue. Wet particles can lodge in the surface and leave stubborn haze after the binder activates. Smooth pavers offer fewer places for loose grains to hide, while deeply patterned stone needs closer surface preparation before the joints are wetted.
Prevent residue before activation. A professional clears debris and checks the paver texture, then sweeps sand into the joints while keeping excess off the surface. A soft brush can move grains out of grooves without scuffing the paver. Inspect the surface from different angles, since dry residue can be hard to see.
Water application also requires care. The installer follows product directions and wets the joints without flooding the paver faces. Excess water can move the binder and sand, while too little can leave the material improperly set. On a textured patio, working in small sections allows closer inspection and cleanup before wet particles settle into recessed patterns.
If haze appears, identify whether it is loose sand, cured polymeric residue, or another surface mark. A dry brush can remove loose grains, but cured haze needs a method suited to the paver material and product. Aggressive scrubbing or high-pressure cleaning can abrade the surface or disturb the joints. A spot test in an inconspicuous area helps assess a cleaning method before treating the whole patio.
Cracked joints and washout point to different problems. Cracks can signal movement or poor compaction, while washed-out joints often indicate that water is carrying material away. Adding fresh sand over either condition leaves the cause unresolved. A professional assesses joint depth, paving stability, and water flow, then addresses the affected joints and surrounding surface.
Prevent stains before and after installation. Leaves left on a patio can release leaf tannins that stain stone and paving materials. Soil, food spills, and standing organic debris can also mark textured surfaces. Remove debris promptly to limit contact with the paver face and reduce the chance of stains becoming harder to lift.
- Before installation: clear debris and remove excess sand from grooves.
- During activation: follow product directions and control water on the paver surface.
- After installation: remove leaves and spills promptly, and avoid harsh cleaning that disturbs joints.
For existing haze, cracked joints, or washed-out areas, match the repair to the cause and paver texture. Treating symptoms alone can leave residue or joint failure unresolved.
Alternatives to polymeric sand
Polymeric sand isn’t the only option for filling paver joints. The best alternative depends on joint width, paver movement, drainage needs, and intended use. A narrow patio joint calls for a different approach than a wide gap between irregular natural stone pieces. Choosing a material by appearance alone can make joints harder to maintain.
Regular jointing sand is a straightforward option for compatible pavers. It stays loose, so it can be swept back into joints during maintenance. That flexibility can suit a surface where pavers may shift slightly, but water and routine cleaning can also displace the sand. It may need topping up more often than a bound jointing material.
Coarser aggregate can suit wider openings where fine sand would not stay in place. The particle size must match the gap: material that is too small can escape, while oversized pieces may not settle evenly. For example, a broad gap between irregular stones may need different aggregate than a tightly fitted brick walkway. Joint dimensions and paver edges guide the choice.
Mortar-based joints are another option, but they create a more rigid connection than loose sand. This matters on flexible paver installations, where individual units can move. Rigid joints may crack if the paving shifts, so mortar is generally better suited to settings designed to support it. The base, paver type, and existing construction all affect whether it is appropriate.
Some permeable paving systems use open-graded aggregate in the joints. Its larger, clean particles allow water to pass through, unlike fine material that can fill those openings. This approach is intended for compatible paving systems, not as a direct replacement for every patio’s joint sand. Changing materials without considering the base can affect water movement through the surface.
For joints that measure about 1/4 inch, polymeric sand is a common choice, while a 1 1/2-inch gap is too wide for most standard polymeric sands. Those dimensions illustrate why material selection starts with the actual joint, not a general preference. Product instructions remain important for recommended applications and installation requirements.
- Choose regular sand when a loose, maintainable joint suits the pavers and expected upkeep.
- Consider coarser aggregate for wider joints that can hold its particle size.
- Use mortar only where the paving design and support accommodate a rigid joint.
- Match permeable aggregate to a paving system designed to drain through its joints.
Before replacing jointing material, assess why it failed. A loose joint may need replenishment, while recurring washout can point to water movement or an unstable base. Matching the replacement to the paving system helps protect alignment and manage maintenance over time.
Benefits of polymeric sand
Polymeric sand helps keep compatible paver joints filled and more stable than loose sand. Once activated and cured, its binder holds the particles together, reducing routine displacement from foot traffic or surface cleaning. On a walkway, this can help keep joints filled between paving units instead of leaving loose grains across the path.
Filled joints also create a neater, more consistent appearance. Gaps between patio bricks can look unfinished, even when the pavers remain in place. Properly placed jointing material creates uniform lines between units and helps define the paving pattern. The finished look depends on matching the sand to the paver color and joint dimensions.
Weeds are less likely to take hold in joints that remain filled and compact, since there are fewer open spaces for seeds and debris to collect. This does not make a patio weed-proof: seeds can still sprout in soil or organic matter on the surface. Clearing leaves and debris from around pavers helps limit that source of growth.
Joint sand can also reduce the amount of small debris that settles in gaps. For example, windblown soil can collect between pavers where joint material has washed away. Stable, filled joints leave less exposed space for debris to gather. They also make routine sweeping easier because grit is less likely to lodge in open gaps.
On sloped paving, filled joints may help retain material between units during ordinary water flow. The benefit depends on drainage and installation quality. Polymeric sand cannot correct an unstable base or redirect water away from a patio. If water repeatedly carries joint material downhill, address the source and path of the runoff as well as the joints.
Maintenance is another practical benefit. Properly cured polymeric sand can reduce how often joints need replenishment compared with loose sand that is easily displaced. It still needs inspection after heavy rain, cleaning, or visible movement. A professional can distinguish normal surface wear from a deeper issue, such as shifting pavers or recurring washout.
- Joint retention: the activated binder helps hold sand particles together.
- Appearance: even, filled joints define patterns in brick or concrete pavers.
- Debris control: filled gaps leave less room for soil and organic matter to collect.
- Maintenance: stable joints can mean less frequent replenishment than loose sand.
These benefits depend on matching the material to the paving system. Deeply textured stone, wide gaps, poor drainage, or a moving base can affect the result. For a patio or walkway, joint filler supports the finish and routine upkeep, but it cannot replace sound construction or proper water management.
Installing polymeric sand between pavers
Professional installation depends on sound joints, suitable weather, and careful cleanup. Each affects how well the finished surface holds together.
Professional Application of Sand Between Pavers
Professional application involves preparing the joints, spreading sand evenly, compacting it, and activating it according to product directions. This sequence helps prevent shallow spots, uneven bonding, and residue on paver faces. For replacement work, professionals remove failed joint material and debris before refilling, taking care not to disturb paver edges or damage the surface. Porcelain and natural stone require material-specific selection because compatibility depends on the paving and product directions.
Estimating Sand Needs for Professional Installation
A professional estimates sand by assessing the paved area, paver dimensions, and joint width and depth. One bag typically covers about 100 square feet as a rule of thumb, but wider or deeper joints use more material. The estimate also accounts for how much old jointing material needs removal and whether the surface has irregular gaps. These details help avoid short coverage or excess leftover sand.
Weather and Temperature for Professional Application
Professionals look for clear weather, completely dry pavers, and a stable base before applying polymeric sand. Rain or damp joints can interfere with activation, while unsettled weather can disrupt the work. Product directions specify acceptable temperatures, which vary by product. A professional plans around surface dryness and the forecast rather than relying on a calendar date.
Drying and Curing After Professional Installation
Drying and curing depend on the product and weather, so the installer follows its instructions for the surface’s return to use. After application on patios and walkways, pedestrian traffic should be restricted for 24 hours, and vehicle traffic for 72 hours. A 28-day wait after applying polymeric sand is described as sufficient before sealing, allowing the sand to fully cure. This interval helps prevent premature sealing from affecting the finish.
For a walkway or patio with failing joints, request professional paver restoration.
Sealing plans should account for the age of the pavers as well as the cure of the jointing material. Even when the sand has completed the stated 28-day cure interval, that interval does not replace the separate wait after paver installation. Wait a minimum of 3 months after installing pavers before applying a sealer, allowing natural efflorescence to dissipate. In practice, the sealing decision should respect whichever applicable waiting period ends later, rather than treating either interval as permission to proceed on its own.
Keep the stages distinct when planning the work: note when the pavers were installed, follow the sand product’s curing directions, and wait until both applicable intervals have passed before sealing. Discuss the intended sealer before jointing begins so the timing is clear. This allows the pavers to undergo the stated efflorescence-dissipation period while also honoring the sand’s curing interval, rather than treating the shorter interval as the only condition for sealing.
Atlas Exterior Solutions: Paver Restoration
Atlas Exterior Solutions LLC provides Paver Restoration for patios and walkways with worn joints, surface buildup, or residue concerns. It’s a practical next step when loose sand keeps washing out or pavers need careful cleaning before joint material is renewed. The right approach depends on the paving material and surface condition.
For properties in Bucks County, attention to paver texture and joint condition helps protect the finished surface during restoration. Soft washing uses low-pressure water and cleaning solutions, unlike pressure washing, which uses higher-pressure water. The method is selected for the surface, and paver work calls for methods matched to the paving. An assessment can clarify whether the priority is cleaning, joint renewal, or both.
Contact Atlas Exterior Solutions LLC to discuss your paver restoration needs.
Plan the next step for your pavers
Start by identifying what you want your patio or walkway to address. If the joints are failing, consider the paver surface, how the area is used, and whether earlier repairs or sealing may affect the work. These details help shape a restoration approach around the paving instead of treating every surface the same way.
Choosing polymeric sand for your pavers is one part of protecting the finished surface. Careful restoration also considers how the paving will be cleaned and maintained. Atlas Exterior Solutions LLC offers Paver Restoration, Soft Washing, and Commercial Pressure Washing for properties across Bucks County, including Newtown, Yardley, Richboro, Bensalem, Langhorne, Levittown, Horsham, and Fairless Hills, as well as Montgomery County. For commercial paver areas, joint condition and surrounding surfaces help determine the work needed.
A thoughtful next step can help you move toward a cleaner, better-maintained outdoor space with confidence.
Frequently Asked Questions
How Many Years Does It Last?
Service life depends on joint condition, drainage, installation quality, and how the paved area is used. A walkway with stable pavers and little water erosion may hold its joints differently from a frequently cleaned patio with recurring runoff. Watch for gaps, loose grains, or shifting pavers. These signs can show when joints need attention, even before the surface looks worn.
What is polymeric sand for pavers, and how does it work?
Polymeric sand for pavers is a joint filler made of sand and binding additives that set when activated with water. It fills the spaces between paving units rather than bonding the pavers together. Joint dimensions and paver material help determine whether a product is appropriate. If joints begin losing material, assess the surrounding paving too, since movement or drainage issues may contribute.
How do professionals install polymeric sand between pavers, and what should you expect during the process?
Professionals assess the surface, clear unsuitable existing material, and prepare the joints before filling and compacting them. They remove excess grains from paver faces and activate the product according to its instructions. Expect access restrictions after the work: pedestrian traffic should stay off patios and walkways for 24 hours, and vehicle traffic for 72 hours. This gives the installation time to set before use.
Polymeric sand vs regular jointing sand: which is better for pavers?
Polymeric sand suits compatible joints where a bonded filler is preferred; regular jointing sand stays loose and can be replenished during maintenance. For example, polymeric sand may suit a patio exposed to frequent rinsing, while loose sand may be preferable when easy replenishment matters most. Let joint width, paver type, drainage, and maintenance needs guide the choice.
Disclaimer
The information on this blog is for general informational purposes only. Results may vary based on surface type, condition, and cleaning methods. Always follow manufacturer guidelines and use proper safety precautions. Atlas Exterior Solutions is not liable for any damages or losses resulting from the use of this information.


